[Tutorial] Building an Enterprise-Grade High-Availability PostgreSQL Cluster from Scratch
Author's Preface
This article is reproduced from my blog, original link: [Tutorial] Building an Enterprise-Grade High-Availability PostgreSQL Cluster from Scratch
Before we begin, please note the following:
- This article assumes you have completed [Tutorial] Building a Minimal High-Availability k3s Cluster from Scratch
- The development environment used in this article is
ArchLinux+Fish Shell. Due to cross-system command syntax differences, please adjust command formats according to your actual situation. - The object storage service used in this article is S3-compatible. Please adjust configuration methods according to your actual situation.
- The commands in this article depend on various CLI tools (marked in the text or in prerequisite tutorials; common Linux CLI tools are not marked here). Since the installation process for CLI tools is tedious and installation steps vary across platforms, we will not elaborate further. Please refer to the official documentation for installation tutorials.
Introduction
PostgreSQL is the most powerful open-source relational database (specific advantages have been discussed extensively online and will not be repeated here), and it is also the relational database I use most frequently (without exception). Therefore, in my tutorials, the relational database used is generally PostgreSQL as the primary choice. You can view this tutorial as a very basic prerequisite tutorial in Kubernetes-related tutorials.
Next, let's discuss CloudNativePG (CNPG). What is it? In short, you can view it as a specialized version of PostgreSQL for Kubernetes, which greatly simplifies the deployment and management process of PostgreSQL. At the same time, to meet enterprise-grade requirements, it provides many advanced features, including high availability (HA), automated backup, disaster recovery drills, automated scaling, and more.
This tutorial will be based on k3s + Longhorn, using CloudNativePG and a generic S3-compatible object storage to build from scratch a high-availability PostgreSQL cluster. We will demonstrate basic backup and operations, and finally, we will manually create failures to test the database's automated recovery capabilities.
Prerequisites
Before starting deployment, please ensure the following prerequisites are met:
Infrastructure
First, you need to prepare a minimal high-availability k3s cluster similar to the one in [Tutorial] Building a Minimal High-Availability k3s Cluster from Scratch
CLI Tools
Before starting the tutorial, you need to prepare the following CLI tools:
kubectl, used for cluster management. In the previous tutorial, we have already installedkubectland configured management permissions for remote clusters (kubeconfig)- Verification command:
kubectl version --short - Ideal output: displays
Client Version: <client_version>; when normally connected, it will additionally returnServer Version: <server_version>
- Verification command:
helm, used for deploying Operator. In the previous tutorial, we have already installedhelmand configured management permissions for remote clusters (i.e.,kubeconfig)- Verification command:
helm version - Ideal output: the
version.BuildInfofield contains information such asVersion: <helm_version>,GitCommit: <commit_hash>, etc.
- Verification command:
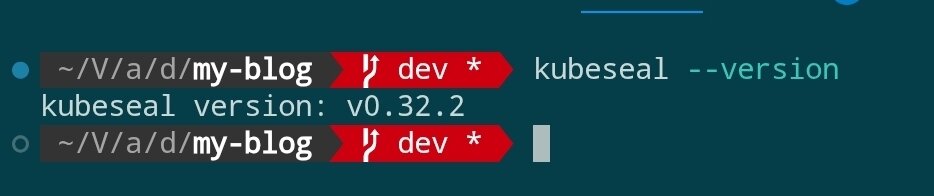
kubeseal, used for encrypting Kubernetes Secrets. Please refer to the official tutorial for installation- Verification command:
kubeseal --version - Ideal output: outputs
kubeseal version: <kubeseal_version>
- Verification command:
openssl, used for generating random passwords. This is generally included with the system. If not, you can refer to the official tutorial for installation- Verification command:
openssl version - Ideal output: outputs OpenSSL version information (e.g.,
OpenSSL <openssl_version> ...)
- Verification command:
Third-Party Infrastructure
You need to prepare an S3-compatible object storage service account (such as AWS S3, Wasabi, Backblaze B2, or self-hosted MinIO) and ensure you can create Buckets and access keys.
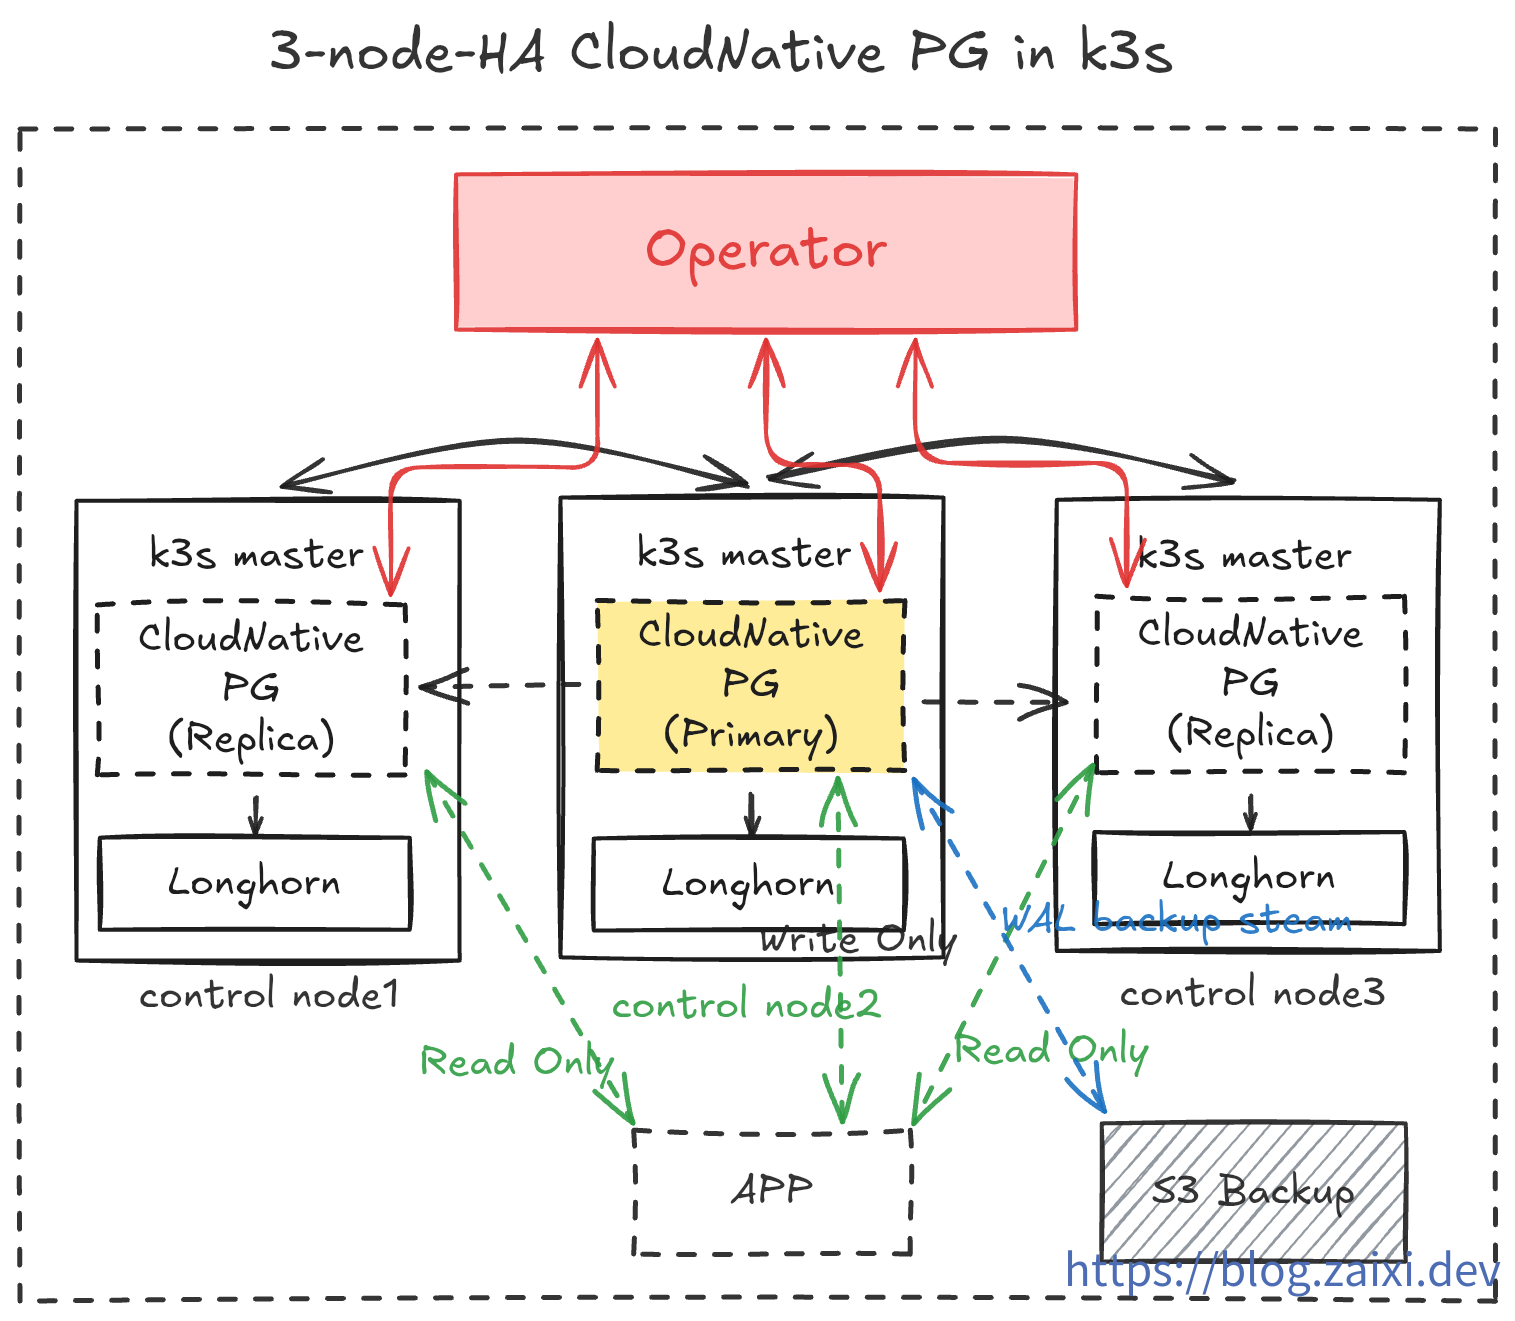
Deployment Architecture Overview
In this tutorial, we will implement the following:
- Run CloudNativePG Operator in the
cnpg-systemnamespace. - Create a 3-replica PostgreSQL cluster (1 Primary + 2 Replicas) in the
data-infranamespace. - Enable
barmancontinuous backup to object storage and expose a ReadWrite Service for applications. - Use
cloudflaredsidecar containers to securely expose the database to the public internet for development and testing. - Operations drills to test database rolling updates and plugin installation.
- Disaster drills to randomly crash nodes and observe automatic recovery capabilities. Test rebuilding the database from backup data in object storage under extreme conditions.
- Implement observability by monitoring database status through
PrometheusandGrafana.
Step 1: Install CloudNativePG Operator
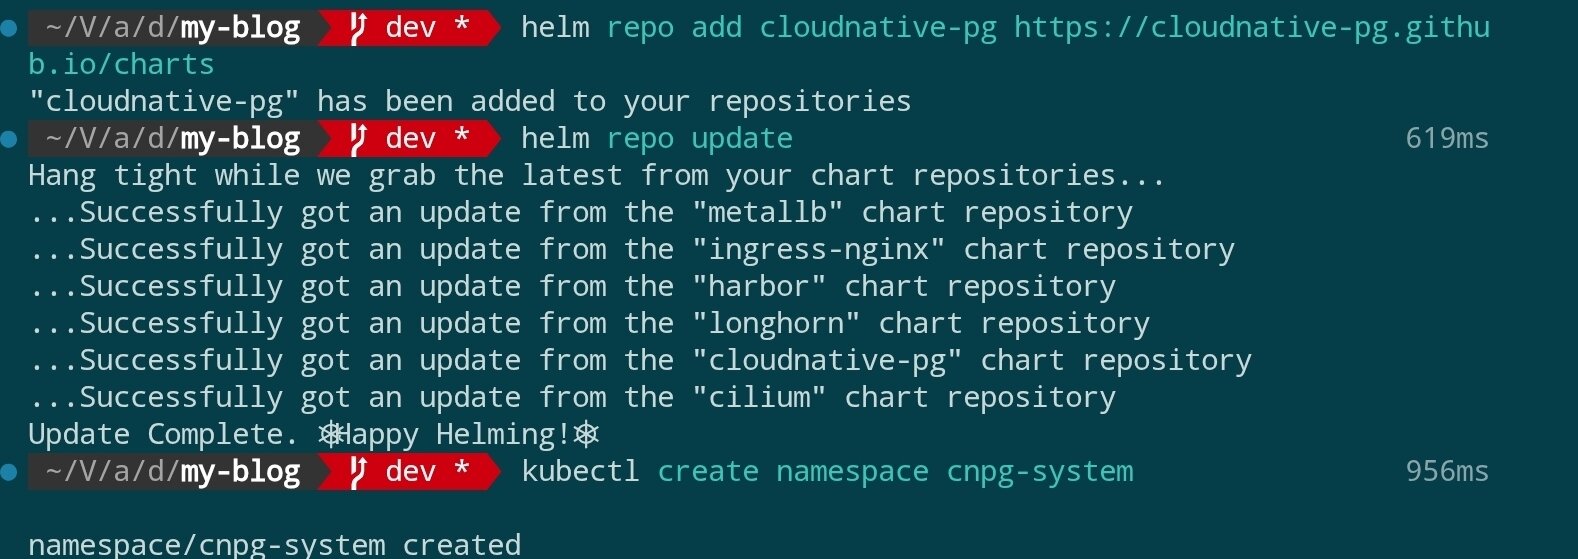
The official recommendation is to deploy the Operator using Helm. First, add the Helm repository and complete the installation:
helm repo add cloudnative-pg https://cloudnative-pg.github.io/charts
helm repo update

kubectl create namespace cnpg-system

helm upgrade --install cloudnative-pg cloudnative-pg/cloudnative-pg \
  --namespace cnpg-system \
  --set controllerManager.resources.requests.cpu=200m \
  --set controllerManager.resources.requests.memory=256Mi \
  --set controllerManager.resources.limits.cpu=500m \
  --set controllerManager.resources.limits.memory=512Mi
Results as shown:

Installation command parameter explanation:
| Parameter/Snippet | Function | Remarks |
|---|---|---|
helm upgrade --install | Upgrade if Release exists, otherwise install for the first time | Keep deployment command idempotent |
cloudnative-pg | Name of the Helm Release | Used by Helm to track this deployment |
cloudnative-pg/cloudnative-pg | Repository and name of the Chart | Requires prior helm repo add cloudnative-pg … |
--namespace cnpg-system | Kubernetes namespace to use | Operator will run in this namespace |
--set controllerManager.resources.requests.cpu=200m | Minimum CPU requested by Controller Manager | Ensure scheduling of at least 0.2 cores |
--set controllerManager.resources.requests.memory=256Mi | Minimum memory requested by Controller Manager | Ensure scheduling of at least 256Mi |
--set controllerManager.resources.limits.cpu=500m | CPU limit for Controller Manager | Will be throttled if exceeding 0.5 cores |
--set controllerManager.resources.limits.memory=512Mi | Memory limit for Controller Manager | May trigger OOM if exceeding 512Mi |
If you want to fix the Chart or image version, you can explicitly add
--version <chartVersion>and--set image.tag=<controllerTag>. When these parameters are omitted, Helm will use the current latest stable version in the repository and the default image specified in the Chart.
Scheduling mechanism supplement: The
controllerManagerPod is scheduled by Kubernetes Scheduler, which first filters out nodes that do not meet resource requests (at least 200m CPU and 256Mi memory), then scores based on current cluster load, and finally selects the most suitable node. Without additionalnodeSelector, taint tolerance, or affinity settings, it may land on any node that meets the conditions, but the result is calculated based on algorithms and node status, not completely random.
If your cluster has network policies enabled such as
kube-routerorCilium, ensure that the controller in thecnpg-systemnamespace can access the Kubernetes API and target namespaces.
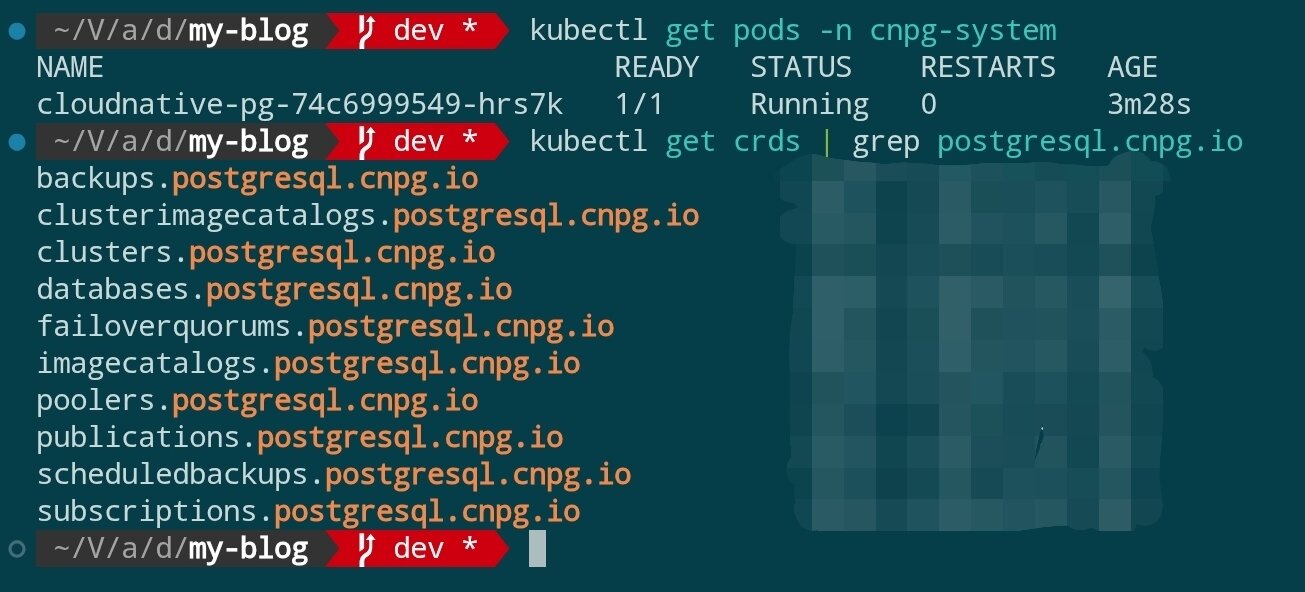
After installation is complete, verify that the Operator is ready:
kubectl get pods -n cnpg-system
kubectl get crds | grep postgresql.cnpg.io
You should see that CRDs such as cluster.postgresql.cnpg.io are registered and the Operator Pod is in Running state.
Step 2: Prepare Namespace and Access Credentials
Install Sealed Secrets
In this tutorial, we need to use Sealed Secrets to manage sensitive information. Before using Sealed Secrets, you need to deploy the controller in the cluster and install the kubeseal CLI locally:
FAQ
- Q: Why introduce Sealed Secrets? A: Sealed Secrets can encrypt Kubernetes Secrets into manifests that can be safely stored in Git. Even if stored in a repository, plaintext will not be leaked. The controller on the cluster side will unseal and generate real Secrets according to permissions, allowing sensitive configurations to use standard GitOps processes for synchronization.
helm repo add sealed-secrets https://bitnami-labs.github.io/sealed-secrets
helm repo update

kubectl create namespace sealed-secrets

helm upgrade --install sealed-secrets sealed-secrets/sealed-secrets \
  --namespace sealed-secrets \
  --set fullnameOverride=sealed-secrets-controller
The above command will run the controller in the
sealed-secretsnamespace with a fixed name ofsealed-secrets-controller, making it convenient for subsequent examples to reference. If the cluster already has an existing deployment, you can skip this step.
Next, install kubeseal locally and execute kubeseal --version to verify the version. Please refer to the official installation tutorial.
Note:
kubesealby default looks for a service namedsealed-secrets-controllerin thekube-systemnamespace. If deployed in thesealed-secretsnamespace like the example without specifying parameters, you will seeerror: cannot get sealed secret service: services "sealed-secrets-controller" not found. Therefore, subsequent commands must explicitly pass--controller-namespace sealed-secrets --controller-name sealed-secrets-controller, or adjust according to the actual installation location.
FAQ
- Q: Why does running
kubesealshowerror: cannot get sealed secret service: services "sealed-secrets-controller" not found? A:kubeseallooks for a service with the same name in thekube-systemnamespace by default. In the example, we deployed the controller in thesealed-secretsnamespace, so we need to add--controller-namespace sealed-secrets --controller-name sealed-secrets-controller, otherwise it won't be found. - Q: Then why not directly deploy the service in the
kube-systemnamespace wherekubesealcan find it by default? A: Mainly for isolation and easier maintenance.kube-systemis generally occupied by cluster underlying components, keeping this namespace clean helps with troubleshooting. At the same time, an independentsealed-secretsnamespace can centrally manage related resources, and it's also convenient for permission control in multi-environment or multi-tenant scenarios. The tool defaults to pointing tokube-systemfor compatibility with common installation methods; we just need to pass parameters according to the actual deployment.
Generate Business Secrets
Prepare a separate namespace for the database layer and use Sealed Secrets to manage sensitive information, avoiding mixing miscellaneous resources in the same space:
kubectl create namespace data-infra
Generate encrypted Secrets for database application accounts:
Step 1: Generate the original Secret manifest (will not be written to the cluster)
kubectl create secret generic cnpg-app-user \
  --namespace data-infra \
  --from-literal=username=app_user \
  --from-literal=password="$(openssl rand -base64 20)" \
  --dry-run=client -o json > cnpg-app-user.secret.json
This command encapsulates the username and random password into a Kubernetes Secret JSON manifest and writes it to cnpg-app-user.secret.json, while keeping it side-effect-free to the cluster. The generated file content is similar to:
{
    "kind": "Secret",
    "apiVersion": "v1",
    "metadata": {
        "name": "cnpg-app-user",
        "namespace": "data-infra"
    },
    "data": {
        "password": "random-password",
        "username": "random-username"
    }
}
Step 2: Use kubeseal to encrypt into a SealedSecret
kubeseal \
  --controller-namespace sealed-secrets \
  --controller-name sealed-secrets-controller \
  --format yaml < cnpg-app-user.secret.json > cnpg-app-user.sealed-secret.yaml
Here we manually read the JSON from the previous step and pass it to kubeseal. The namespace and controller parameters ensure that the CLI can connect to our deployed Sealed Secrets controller. The --format yaml outputs a SealedSecret file that can be submitted to Git. The generated file content is similar to:
---
apiVersion: bitnami.com/v1alpha1
kind: SealedSecret
metadata:
  name: cnpg-app-user
  namespace: data-infra
spec:
  encryptedData:
    password: random-password(locked)
    username: random-username(locked)
  template:
    metadata:
      name: cnpg-app-user
      namespace: data-infra
Step 3: Apply the SealedSecret to the cluster and delete the original Secret
kubectl apply -f cnpg-app-user.sealed-secret.yaml
rm cnpg-app-user.secret.json
After the controller receives it, it will automatically unseal and generate a regular Secret with the same name (cnpg-app-user) for subsequent database resources to reference. Keep cnpg-app-user.sealed-secret.yaml safe for use in subsequent CI/CD processes.
Prepare S3-Compatible Object Storage Credentials
- Log in to the object storage service console (such as AWS S3, Wasabi, Backblaze B2, or self-hosted MinIO cluster), create a dedicated Bucket, for example named
cnpg-backup, and select the Region closest to your Kubernetes cluster. - In the Bucket's access policy, disable public read/write and only allow credential access. If the provider supports lifecycle or version management, you can configure them in advance according to compliance requirements.
- Go to the credentials or key management page, create a pair of Access Keys for this tutorial, granting at least
Object ReadandObject Writepermissions for the target Bucket. If necessary, you can restrict to a specific prefix range. - Record the
Access Key ID,Secret Access Key,Region(if applicable) returned by the console, and the S3 Endpoint, for examplehttps://s3.ap-northeast-1.amazonaws.comor a custom domain provided by the provider. Some providers will note whether Path Style access is required; please record this as well. - Save this information to your password manager and prepare the plaintext values to be written to Kubernetes Secret:
aws_access_key_id,aws_secret_access_key,region(if Region is not fixed, fill in the provider's recommended value), and confirm thedestinationPathto be used in CNPG (such ass3://my-cnpg-backups/production).
After completing the console configuration, you can continue to use Sealed Secrets to manage this set of credentials.
Configure Object Storage Credentials Using SealedSecret
When planning to enable object storage backup, similarly use Sealed Secrets to generate access credentials (using S3-compatible service as an example):
kubectl create secret generic cnpg-backup-s3 \
  --namespace data-infra \
  --from-literal=aws_access_key_id=AKIA... \
  --from-literal=aws_secret_access_key=xxxxxxxxxxxx \
  --from-literal=region=ap-northeast-1 \
  --dry-run=client -o json \
  | kubeseal \
      --controller-namespace sealed-secrets \
      --controller-name sealed-secrets-controller \
      --format yaml > cnpg-backup-s3.sealed-secret.yaml

kubectl apply -f cnpg-backup-s3.sealed-secret.yaml
Step 3: Declare PostgreSQL Cluster
CloudNativePG uses the Cluster custom resource to define the database stack. Below is a production-friendly example (storage class uses Longhorn deployed in the previous tutorial):
apiVersion: postgresql.cnpg.io/v1
kind: Cluster
metadata:
  name: cnpg-ha
  namespace: data-infra
spec:
  instances: 3
  imageName: ghcr.io/cloudnative-pg/postgresql:16.4
  primaryUpdateStrategy: unsupervised
  storage:
    size: 40Gi
    storageClass: longhorn
  postgresql:
    parameters:
      max_connections: "200"
      shared_buffers: "512MB"
      wal_level: logical
    pg_hba:
      - hostssl all all 0.0.0.0/0 md5
    authentication:
      superuser:
        secret:
          name: cnpg-app-user
      replication:
        secret:
          name: cnpg-app-user
  bootstrap:
    initdb:
      database: appdb
      owner: app_user
      secret:
        name: cnpg-app-user
  backup:
    barmanObjectStore:
      destinationPath: s3://my-cnpg-backups/production
      endpointURL: https://s3.ap-northeast-1.amazonaws.com
      s3Credentials:
        accessKeyId:
          name: cnpg-backup-s3
          key: aws_access_key_id
        secretAccessKey:
          name: cnpg-backup-s3
          key: aws_secret_access_key
        region:
          name: cnpg-backup-s3
          key: region
    retentionPolicy: "14d"
  monitoring:
    enablePodMonitor: true
Save as cnpg-ha.yaml and apply:
kubectl apply -f cnpg-ha.yaml
CNPG will automatically create StatefulSet, PVC, services, and other resources. Wait for the Pod to start:
kubectl get pods -n data-infra -l cnpg.io/cluster=cnpg-ha -w
When both Primary and Replica are in Running state, the database cluster deployment is complete.
Step 4: Verify High Availability and Service Exposure
Check Services and Connection Information
kubectl get svc -n data-infra -l cnpg.io/cluster=cnpg-ha

kubectl port-forward svc/cnpg-ha-rw 6432:5432 -n data-infra
psql "postgresql://app_user:$(kubectl get secret cnpg-app-user -n data-infra -o jsonpath='{.data.password}' | base64 -d)@127.0.0.1:6432/appdb"
CNPG by default creates -rw (read-write) and -ro (read-only) Services, making it convenient for applications to connect to the primary and replica databases respectively.
Simulate Failover
Force delete the Primary Pod to verify automatic recovery capability:
kubectl delete pod -n data-infra \
  $(kubectl get pods -n data-infra -l cnpg.io/cluster=cnpg-ha,role=primary -o jsonpath='{.items[0].metadata.name}')
Within seconds, CNPG will automatically promote a Replica to Primary. Confirm the role change with the following command:
kubectl get pods -n data-infra -L role
kubectl logs -n data-infra -l cnpg.io/cluster=cnpg-ha,role=primary --tail=20
Step 5: Backup and Disaster Recovery Strategy
- Continuous Backup (PITR): The
barmanObjectStoreconfiguration continuously writes WAL to object storage. You can trigger full backups using thekubectl cnpg backupcommand. - Regular Recovery Drills: Create
Backup+ClusterCRs in a temporary namespace to verify recovery from object storage to a specific point in time. - Monitoring and Alerting: After enabling
monitoring.enablePodMonitor, you can scrape key metrics such ascnpg_pg_replication_lagandcnpg_pg_is_in_recoveryin Prometheus. - Resource Quotas: Configure
LimitRangeandResourceQuotafor thedata-infranamespace to prevent database instances from monopolizing node resources.
Common Operations
- Online Scaling: Simply adjust the
spec.instancescount, and CNPG will automatically create new Replicas and synchronize data. - Parameter Adjustment: Update
spec.postgresql.parameters, and the Operator will trigger a rolling restart to apply the configuration. - Version Upgrade: Modify
spec.imageNameto specify a new version image. CNPG will first create a new Replica, perform aswitchover, and then reclaim the old primary. - Logical Replication: Through
pg_hbaandwal_levelconfiguration, you can synchronize specific databases/tables to external data warehouses.
Summary and Next Steps
By now, we have deployed a PostgreSQL cluster with automatic failover, continuous backup, and declarative management capabilities on a high-availability k3s cluster. The next steps you can consider:
- Introduce Grafana Loki or ELK to collect database logs and improve observability.
- Use CloudNativePG Pooler or PgBouncer to optimize connection pool management.
- Combine with GitOps tools like Argo CD/Fleet to incorporate database CRs into continuous delivery pipelines, enabling configuration change review and rollback.